l.a.c.
Language Acquisition Center
Changing group types
In this guide, we'll be changing student 29's group to the active group, which is Group A. Currently computer 29 is set to the L Group.
![]()
1) Click on the ![]() (Grouping) icon.
(Grouping) icon.
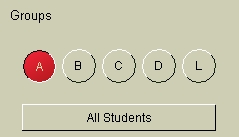
2) Select the appropriate group in which you want the new student to be in. In this example, we want to change computer 29 to Group A, which is our active group, so we select "A" under "Groups."
3) Click on the student that's out of the active group that you want to be in the active group. In this example, it's computer 29. The computer is out of the active group and we want it to be in the active group.
![]() The computer will now immediately change from it's previous group to the new active group you selected.
The computer will now immediately change from it's previous group to the new active group you selected.
If you have many different groups scattered all over the classroom and you would like everyone to be in one group, select the appropriate group letter and click on the "All Students" button. That will switch everyone to the selected group.